

Advantages of S3 & CloudFront
The Cost of a Slow Website
We’ve all come across websites that load so painfully slow that our patience wears thin and we end up hitting the back button. It’s bad for us because we couldn’t get to the content we were expecting; it’s bad for the business owner because they just lost traffic and a potential conversion.
It’s a lose-lose situation, and while the monetary cost may vary, the problem can be serious enough to warrant a solution. According to a Hosting Tribunal statistic, 1-3 seconds in loading time has a bounce rate of approximately 32% – not too bad; however, increase that by one second, and the bounce rate bounces up to 90%. And that’s just one statistic!
Speed It Up With Amazon’s S3 & CloudFront
There are a number of ways to fix a slow website problem; today, we will focus on offloading the entire website to Amazon’s S3 / CloudFront combo and be done with it.
Why offload it to S3 and CloudFront?
There are many reasons, but here are my top three:
- Unlimited storage & fast server response. Since you’ll be running your website on a content delivery network (CDN) with edges all over the world, server response time should be top notch. This includes both your assets (images, style sheets, etc) as well as your page’s html code.
- No server overhead or maintenance. YES!!! Nothing puts a damper on my day like having to deal with unexpected server admin issues that gobble up hours of time. Since S3 is not a web server per se, you can forget about this issue. (There is a caveat, but we’ll cover that in a bit.)
- AWS’ S3/CloudFront comes with free SSL and virtually no security issues. Not much else to say about that, other than, because it’s not a traditional web server, the only security issue is access to S3 buckets. And these are easily locked down.
You may have your own reasons. If you do, please leave a comment – I’d love to know why you’re interested in hosting (or are hosting) your site on S3. And if you’re hosting your website on a different CDN, please share as well.
What About WordPress?
So, there is one caveat. This works only for static websites because S3 does not provide the capability to run any server side code, such as PHP, .net or Java. Therefore, if you are running a WordPress website, a web store or any other website that requires significant processing, you will not be able to take advantage of this without creating an external service or utilizing some sort of microservice. You will need to convert your site to a static one and convert any user interaction components that require server processing – such as contact forms – to a different system.
What We’re Doing Today
Today we will go over the process of setting up and hosting a website on Amazon’s S3. We will also utilize Amazon’s CloudFront CDN so that we can distribute html files and assets to multiple geographically diverse edge locations, which will result in much faster overall download times. To accomplish this, we will also employ Route 53 for DNS management and AWS Certificate Manager for SSL certificates.
Let’s get started.
For Your Convenience…
For your convenience, the following outline allows for quick access to any of the steps in this tutorial.
S3 buckets
www bucket
- Create bucket to hold website files (www version of domain)
- Configure bucket properties
- Configure bucket permissions
- Upload files
non-www (naked domain) bucket
- Create bucket for 301 redirection (non-www version of the domain)
- Configure 2nd bucket properties
- Configure 2nd bucket permissions
SSL
CloudFront
Route 53
Step 1: Setting Up S3 for Static Website Hosting
The first step is to prepare your S3 environment. This tutorial assumes that you already have an AWS account, but if you don’t, you can click this link to sign up. It’s quick, easy and free.
To make this tutorial concrete and easier to follow, we’re going to set up a new website for a real domain, www.stage-threads.com. The website will run on the www bucket, while the naked, non-www bucket will 301 redirect to www.
Create an Amazon S3 Bucket for the www domain
Create Bucket
- In your AWS admin panel, go to “Services” -> “S3” -> “Create bucket”.
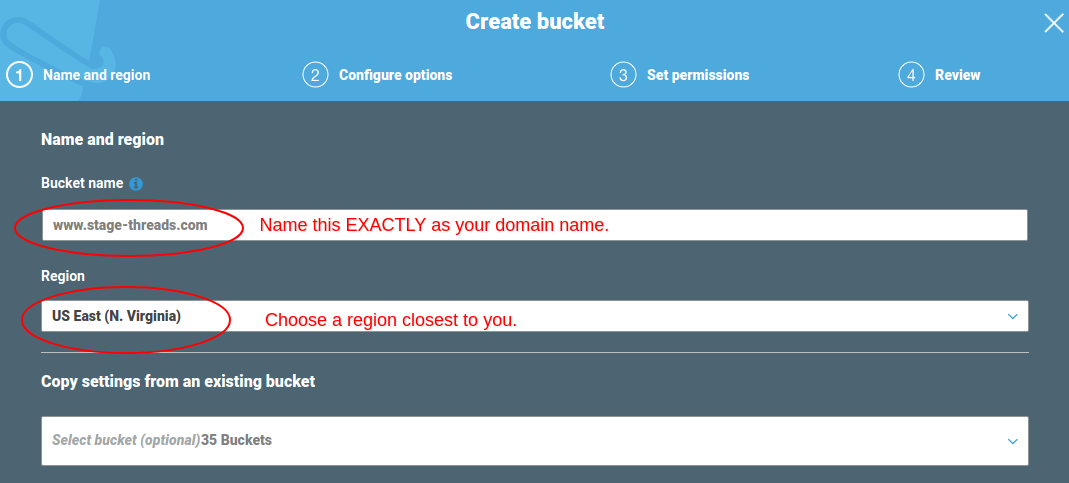
- Enter your bucket name, region and click “Next”.
NOTE: It’s important that you name your bucket exactly as your domain. So if in my case, I created a bucket named www.stage-threads.com. - Leave all options as they are for the next step, Properties and click “Next”.
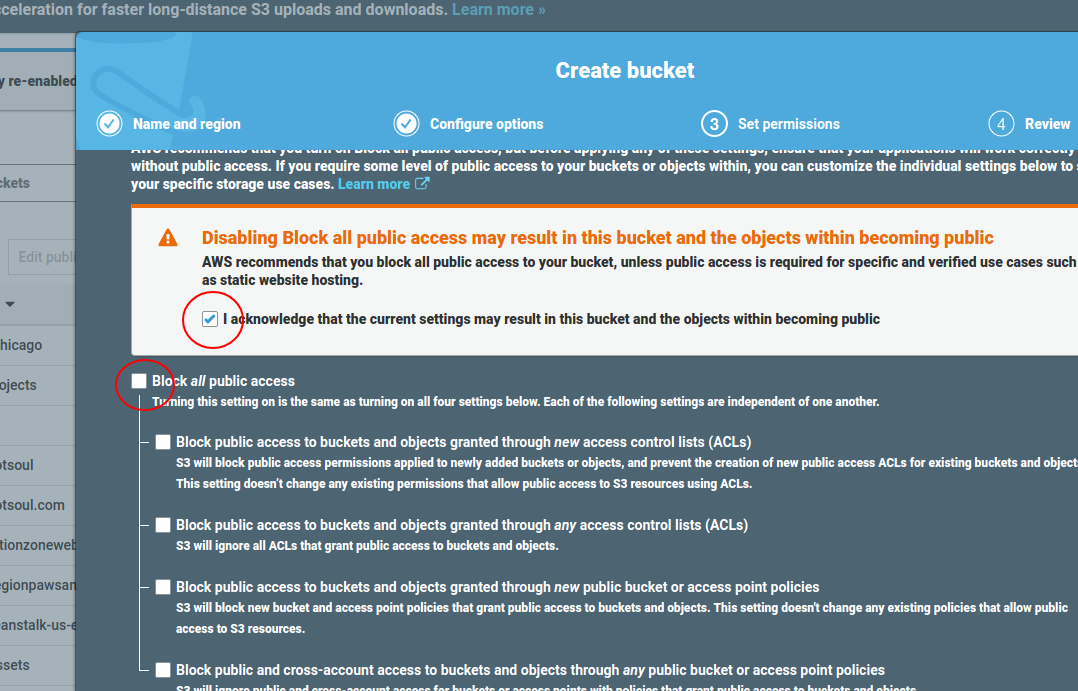
- In Step 2, Configure Options, uncheck the “Block all public access” option, check the box above to acknowledge that you will be allowing public access to the bucket, then click “Next”. Since it’s a website, we definitely need the public to be able to access it.
- Hit “Create Bucket”.
Properties Configuration
Now that we have our bucket created, let’s configure it to host a website.
- Navigate to your new S3 bucket, and click on the “Properties” tab.
- Click on the “Static website hosting” card.
- Select the “Use this bucket to host a website” option.
- Enter index.html in the index document field and error.html into the error document field. Index.html Is the default page, just like a standard server setting. Error.html will be the 404 page. Pretty easy, right?
- Hit save.

Permissions Configuration
Next, we’ll take care of all the necessary permissions so the the bucket is accessble to the world.
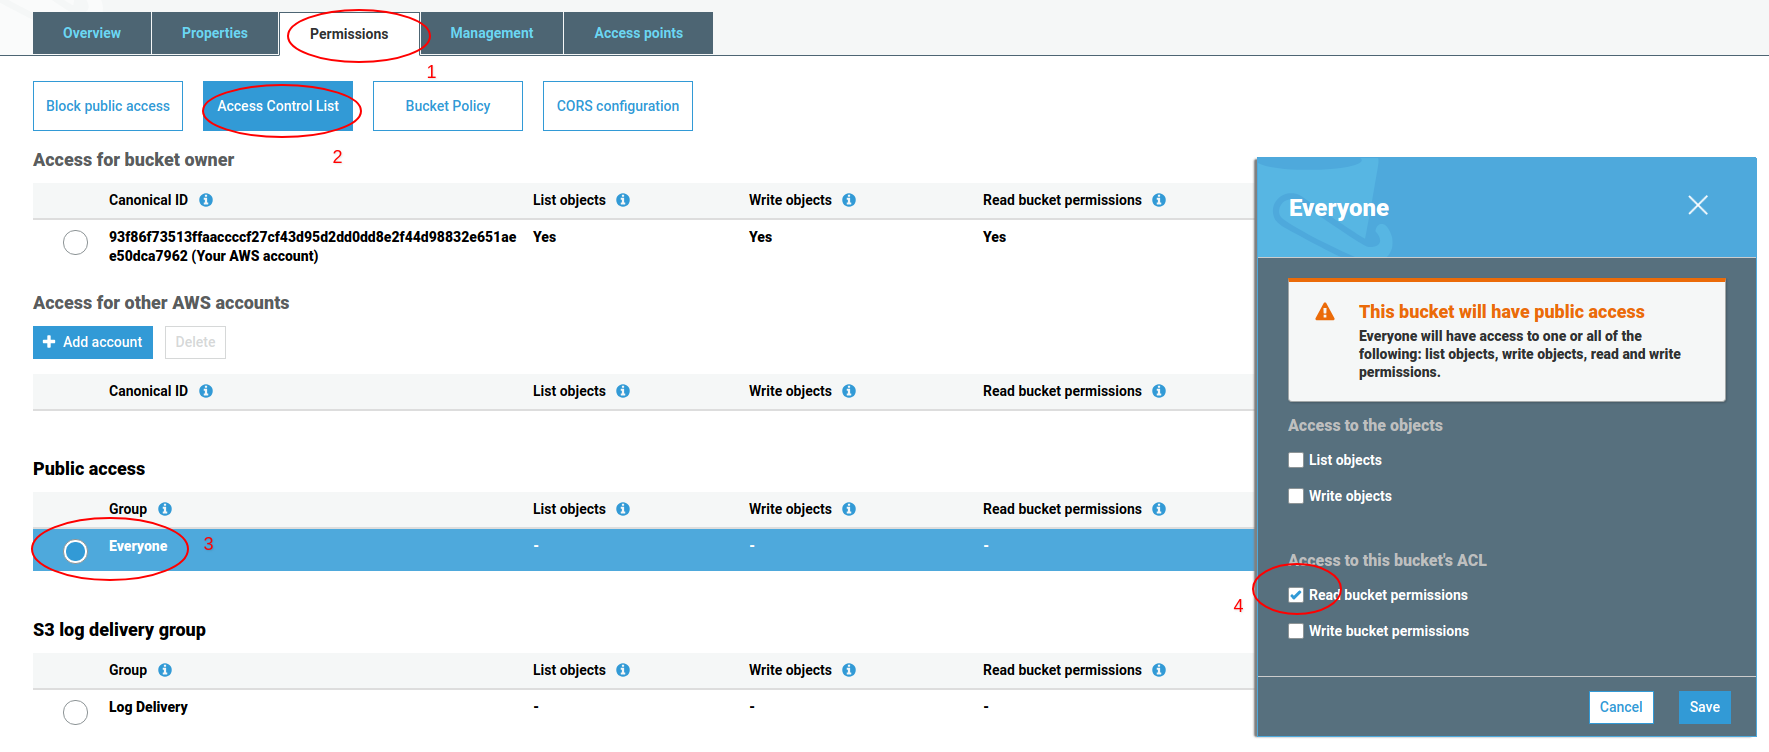
- Click on the “Permissions” tab.
- Click the “Access control list” button.
- Select “everyone” under the “public access” section.
- In the slide-out options, check the “read bucket permissions” under the “Access to this bucket’s ACL” section.
- Hit save.
- Click the “Bucket Policy” tab.
- Paste the following JSON code into the ARN editor and save. Change the “Resource” domain to your domain and hit Save.
{
    "Version": "2008-10-17",
    "Id": "PolicyForPublicWebsiteContent",
    "Statement": [
        {
            "Sid": "PublicReadGetObject",
            "Effect": "Allow",
            "Principal": {
                "AWS": "*"
            },
            "Action": "s3:GetObject",
            "Resource": "arn:aws:s3:::stage-threads.com/*"
        }
    ]
}
.

Upload Files
- Click on the “Overview” tab.
- Drag and drop all your website files on the “Upload” button, then hit the “Upload”” button in the popup.
And here is a video showing the whole process from beginning to end:
Check it
Now that we have all the files uploaded, let’s check our website by going to the provided, default S3 domain (endpoint). In my case, it’s http://www.stage-threads.com.s3-website-us-east-1.amazonaws.com/ . The url structure is https://[you-bucket-name].[your-region].amazonaws.com. If you’re unsure what it should be in your case, just go to your bucket, then go to “Properties” -> “Static website hosting”. There, you will see the “Endpoint” url, which you can just click to view the website in your browser.

Try navigating around the website to ensure everything works as expected. If something is not working, check your website code to ensure that you don’t have any hard coded urls pointing to a different domain.
If you’d like, you can verify that the site is being served by the S3 server by opening up your browser console and checking the response headers. Here is mine:

What About WordPress or Dynamic Websites?
Since S3 can only host static, html websites, you will not be able to host a WordPress or dynamic website as is; you will have to convert it to a static website. If you only have contact forms or minimal user interaction, you can implement 3rd party solutions that will run clientside, thereby bypassing the need for serverside processing.
To convert a dynamic website to a static one, you’ll essentially need to “download” the complete website. If you’re a Linux or Mac user, you can use wget with flags such as this:
`wget -r -l inf http://www.yourdomain.com`
This will download your entire website – pages, assets, all properly linked.
Windows users will need to find an alternative solution, such as httrack or something similar.
Create an Amazon S3 Bucket for the naked domain
Now that we have our “master” bucket for the www subdomain, we’re going to create a bucket for the naked domain (non-www). This bucket will NOT hold any files and will only redirect to the www bucket we have already created. The process is almost identical.
Create Bucket
- Go to “Services” -> “S3” -> “Create bucket”.
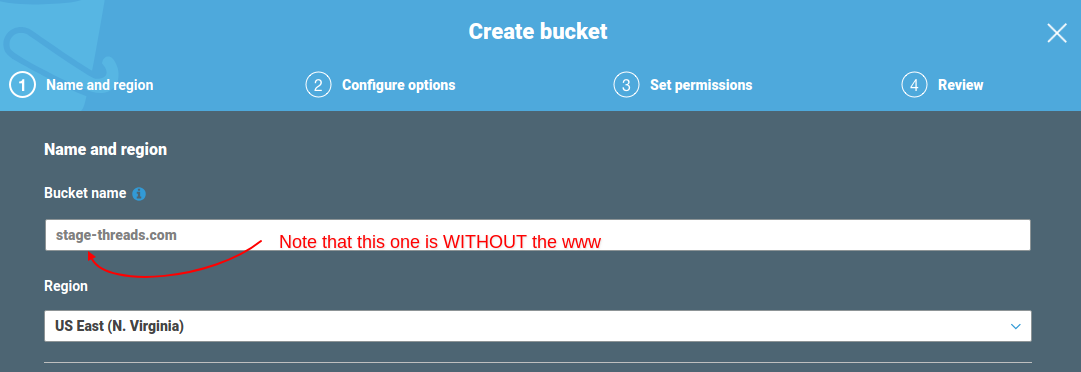
- Enter your bucket name and region. NOTE: It’s important that you name your bucket exactly as your domain. So if in our case, we are creating a bucket for stage-threads.com.
- The next steps are identical to the first bucket we created. Uncheck the “Block all public access” option and check the box to acknowledge that you will be allowing public access to the bucket. Since it’s a website, we definitely need the public to be able to access it.
- Hit “Create Bucket”.
Properties Configuration
- Navigate to your new S3 bucket, and click on the “Properties” tab.
- Click on the “Static website hosting”.
- Select the “Redirect Request” option. NOTE: This is different from the previous bucket setup.
- Enter your www domain name in the “Target bucket or domain” field. In my case, it’s www.stage-threads.com.
- In the “Protocol” field, enter “https”.
- Hit save.

Permissions Configuration
- Click on the “Permissions” tab.
- Click the “Access control list” button.
- Select “everyone” under the “public access” section.
- In the slide-out options, check the “read bucket permissions” under the “Access to this bucket’s ACL” section.
- Hit save.
- Click the “Bucket Policy” tab.
- Paste the following JSON code into the ARN editor and save. Change the “Resource” domain to your domain. Notice how the “Resource” domain is different.
{
    "Version": "2008-10-17",
    "Id": "PolicyForPublicWebsiteContent",
    "Statement": [
        {
            "Sid": "PublicReadGetObject",
            "Effect": "Allow",
            "Principal": {
                "AWS": "*"
            },
            "Action": "s3:GetObject",
            "Resource": "arn:aws:s3:::stage-threads.com/*"
        }
    ]
}

And that’s for S3. Next we’ll move on to setting up CloudFront.
Step 2: Setting Up SSL for CloudFront
Now that we have the site running on the default AWS domain, we need to change this so that we can run it on our own domain. In my case, I will run the main site on www.stage-threads.com and set up a 301 redirect for stage-threads.com to redirect to www.
To accomplish this, we’re going to put CloudFront in front S3 for better performance. However, we’re first going to install the free AWS SSL certificates. This is a recent requirement by Amazon. If you’d like, you can read more about how AWS has made it mandatory that custom domain CloudFront distributions use https .
So we’re going to create two certificates:
- one for the naked domain, in my case stage-threads.com,
- and a wildcard cert for all other subdomains, including www.
DNS: Read this before moving on...
Before we go any further, we need to take care of some DNS stuff. To follow along with this tutorial, it will be necessary for you to move to Amazon’s Route 53 DNS service. Part of the reason for this is that not all providers support A record aliases, which we will need to utilize.
Luckily, the move is very easy. Just follow this tutorial on how to migrate a domain from GoDaddy to AWS Route 53 .
IF YOU RUN INTO ANY ERRORS:
- Make sure to remove your SOA record from the text file. This conflicts with Route 53’s.
- Make sure to remove your NS records from the text file. Your name servers will now be on AWS.
AND YOU CAN ALWAYS REVERT…
If something doesn’t work out, you can always revert to GoDaddy’s name servers.
Ok, so assuming that your DNS is all set, let’s continue on.
Install an SSL certificate for the naked domain
- Go to “Services” -> “Certificate Manager” , then click the “Request a certificate” button.
- Ensure that “Request a public certificate” is selected, then click the “Request a certificate” button in the lower right corner.
- In the “Domain Name” field, enter your naked domain. In my case, I entered “stage-threads.com”.
- Select “DNS validation” then click “Next”, followed by “Review”, then “Confirm and request”.
- At this point, you should be at the “Validation” screen of the process. Since we’re using Route 53 for our DNS management, simply click “Create record in Route 53”, followed by “Create”, then “Continue”.
- You should now see your “Certificates” screen with the status for your new cert most likely in the “pending validation” status.
Create a wildcard AWS SSL Certificate for the www subdomain
This is almost identical to the previous certificate.
- Click the “Request a certificate” button again to create a new cert.
- Ensure that “Request a public certificate” is selected, then click the “Request a certificate” button in the lower right corner.
- In the “Domain Name” field, enter your domain with an asterisk (*) as the subdomain. In my case, I entered *.stage-threads.com. <---This is different from the previous cert.
- Select “DNS validation” then click “Next”, followed by “Review”, then “Confirm and request”.
- At this point, you should be at the “Validation” screen of the process. Again, because we’re using Route 53, simply click “Create record in Route 53”, followed by “Create”, then “Continue”.
- You should now see your “Certificates” screen with the status for your new cert most likely in the “pending validation” status.
Before continuing on, you’ll need to wait until both of your certificates are issued. From my experience, it typically takes about 5 minutes to validate, although official AWS docs say it can take up to several hours .
Step 3: Setting Up CloudFront Distributions
Now that we have our SSL certificates, let’s create our CloudFront distributions. We’ll need to create two distros:
- One for the naked domain
- One for the www subdomain
Create a CloudFront Distribution for the naked domain
- Go to “Services” -> “CloudFront” to open up your AWS CloudFront panel.
- Click “Create Distribution” followed by “Get Started” under the Web delivery method section.
- In the “Origin Domain” field, select your S3 bucket, BUT… and this is important … you’ll need to change the S3 part of the domain to include your bucket domain INCLUDING the region . For my bucket, it’s www.stage-threads.com.s3-website-us-east-1.amazonaws.com. Here is an explanation why this is so.
- In the “Default Cache Behavior Settings” section, select “Redirect HTTP to HTTPS” for the “Viewer Protocol Policy” field.
- In the “Distribution Settings” section, type in your naked domain name into the “Alternate Domain Names (CNAMEs)” field. In my case, I typed in staged-threads.com.
- In the “SSL Certificate” section, select “Custom SSL Certificate”.
- Click on the text field below the selection and select the certificate for naked domain
- Click “Create Distribution”.
Create a CloudFront Distribution for the www domain
Creating the distro for the www version is identical.
- Go to “Services” -> “CloudFront” to open up your AWS CloudFront panel.
- Click “Create Distribution” followed by “Get Started” under the Web delivery method section.
- In the “Origin Domain” field, select your S3 bucket for the www bucket. Again make sure that you use the website endpoint, which includes the region, not the API endpoint. More about this here.
- In the “Default Cache Behavior Settings” section, select “Redirect HTTP to HTTPS” for the “Viewer Protocol Policy” field.
- In the “Distribution Settings” section, type in you naked domain name into the “Alternate Domain Names (CNAMEs)” field. In my case, I typed in www.staged-threads.com.
- In the “SSL Certificate” section, select “Custom SSL Certificate”.
- Click on the text field below the selection and select the certificate for wildcard (*) version of the domain
- Click “Create Distribution”.
Before going on to the next steps, you’ll need to wait until both of the distributions have deployed. This usually takes several minutes.
Step 4: Setting Up the DNS “A” Records
For the final step of this whole process, we’ll point the DNS “A” records to the CloudFront distributions. In our case, we will run the main site on www.stage-threads.com and set up a 301 redirect for stage-threads.com to www.
Set up A record for www
- Go to your AWS Route 53 panel and click on “Hosted Zones”.
- Select your hosted zone for yourdomain.
- If you already have an “A” record for the naked domain and/or a www “A” or CNAME, delete them by selecting them and choosing Delete from the Actions menu.
- Click the “Create Record Set” button.
- In the “name” field, enter www.
- In the “Type” field, select A-ipv4 Address.
- Select “yes” for “Alias”.
- Click on the “Alias Target” field and under the “– CloudFront Distributions –” section, select your www distribution, then hit “Create”.
Set up A record for naked domain (non-www)
The process is pretty much identical.
- In the AWS Route 53 control panel, select your hosted zone.
- Click the “Create Record Set” button.
- In the “name” field, do not enter anything.
- In the “Type” field, select A-ipv4 Address.
- Select “yes” for “Alias”.
- Click on the “Alias Target” field and under the “– CloudFront Distributions –” section, select your naked domain distribution for the and hit “Create”.
That should be it. If you navigate to your website, in my case, www.stage-threads.com, you should now see your website. Click around to make sure that all the links work as expected. If your page is not showing up, give the DNS records a few minutes to propagate.
Now that we have everything in place, let’s ensure that all the redirects are working as expected. So the only version of the domain that should display the page, www running on https. Everything else should redirect. So in my case, every request should end up at https://www.stage-threads.com. This includes:
https://stage-threads.com should redirect to https://www.stage-threads.com
http://stage-threads.com should redirect to https://www.stage-threads.com
http://www.stage-threads.com should redirect to https://www.stage-threads.com
Here is a screenshot of the responses in my Linux console:

You can also take a look at the video below to see how it checks out in the browser.
So that’s it for getting the site up and running, however, there are a few more items to consider and know about before going to production. Let’s go over those now.
Website File Updates & Deletions
Since we are now running the website on the CloudFront CDN, the website is mirrored and distributed to various edges around the globe. So what happens if you need to update a file? How will you ensure that all the edges get updated with the fresh content?
CloudFront Invalidation
CloudFront provides an easy way to deal with this issue. You just tell it which files – or if all files – need to be scrapped and refreshed. Here is how to do it:
- Go to the AWS CloudFront distributions panel and click on your www distribution id from the list. We only need to invalidate the www version.
- Click on the “Invalidations Tab” , then click the “Create Invalidation” button.
- In the “Object Paths” field, enter the files you want to to invalidate/refresh – one file per line. You can use the asterisk (*) as a wild card.
- For example,
- Index.html invalidates your home page only
- images/* invalidates everything in the images directory
- * invalidates all the files – the whole website
The results typically propagate immediately after an update, from what I’ve seen, but if they don’t, give it a few minutes to take effect.
Dynamic Website Functionality
Since S3 can only host static, html websites, you will not be able to run database driven websites such as WordPress. However, there is an easy way around this if you’re running a basic site with no more than a contact form or two. Although you don’t have server side code to work with, Javascript is fair game and with 3rd party microservices becoming more and more popular, it makes it easier to implement dynamic functionality via JS APIs.
Embeddable Forms
If you have a contact form, for example, you can sign up for a service such as CognitoForms and simply embed your contact form on a static site. The advantage of this is twofold:
- You can offload all maintenance of the form processing and storage to a 3rd party
- The data never hits your server so you don’t have to worry about sensitive information storage.
Media
You already will be serving the media you host from a CDN, so you’re ahead of the game. Of course, you can always embed Youtube or Vimeo media on your website using Javascript.
Conclusion
Amazon’s S3 and CloudFront provide a great combination for static websites by taking advantage of a “serverless” architecture and CDN. This blog only scratches the surface of the capabilities, but hopefully it’ll at least get you up and running. Or at least give you an idea to play around with. If you have any suggestions, tips, comments or see any inaccuracies, please leave a comment below. Let’s all learn from each other.
Until next time, happy coding:)
References:
https://ithoughthecamewithyou.com/post/enable-gzip-compression-for-amazon-s3-hosted-website-in-cloudfront
https://docs.aws.amazon.com/acm/latest/userguide/gs-acm-validate-dns.html
https://docs.aws.amazon.com/AmazonCloudFront/latest/DeveloperGuide/ServingCompressedFiles.html
https://aws.amazon.com/about-aws/whats-new/2019/04/amazon-cloudfront-enhances-the-security-for-adding-alternate-domain-names-to-a-distribution/
https://aws.amazon.com/premiumsupport/knowledge-center/s3-website-cloudfront-error-403/
https://lobster1234.github.io/2017/05/10/migrating-a-domain-to-amazon-route53/
https://hostingtribunal.com/blog/how-speed-affects-website/#gref