


In this tutorial, we will learn how to modify Divi’s shop module product listings. Although Divi provides a great amount of control for all of its modules, sometimes the provided options just aren’t enough for a particular use case.
Why WooCommerce & Divi?
Before we get started, let’s do a quick introduction to WooCommerce and the Divi theme, and why the two make a great cms + ecommerce solution.
WooCommerce: Top Rated Ecommerce Plugin for WordPress
WooCommerce is a plugin for WordPress that has been rated as one of the best self-hosted ecommerce solutions available. Launched in 2011, it has continuously risen in popularity over its lifetime.
And for good reason:
- It is a free ecommerce solution.
- It has a great community of developers and support.
- It is easily extendable to provide any feature needed in an online store.
- Because it is a plugin for WordPress, it does not require developers to make trade offs between the best CMS (content management system) and ecommerce solution. The two work in tandem to provide the best of both worlds.
From a business perspective, it provides all the necessary features to launch a bonafide online store, but equally important, it is well coded. It allows PHP programmers to easily modify the plugin’s functionality through the use of filters and events.
Divi Theme: Best 2019 Theme for WordPress
Divi, a product by Elegant Themes, is one of today’s best WordPress themes. Through an easy-to-use visual builder, it allows web developers to quickly and efficiently build websites. This saves time and money for clients while simultaneously allowing developers to focus on design and business logic instead of code.
Although Divi is not a free solution, it is very affordable and definitely worth it, considering the tremendous value it provides. In addition to the aforementioned website builder, it also comes with 20 pre-made beautiful and modern Divi layouts. These are great to get the project started quickly, or just for brainstorming purposes.
The Divi ‘Shop Module’
Divi is a modular system, providing numerous modules, or components, each with a specific task. The Divi module named ‘Shop’ is one such module. It is a WooCommerce element which provides an easy way to display a list of products.
Often times, this particular module is used on the shop page to list the store’s available products. Alternatively, it can be used to list featured products on landing pages or the home page. It’s a very versatile element, but with a very specific purpose: to display a list of your WooCommerce products.
Why Modify the ‘Shop Module’
Although Divi’s Shop module provides a number of content and design settings, sometimes the desired outcome needs a bit more customization than the module provides.
In my case, I needed the ability to display the product’s short description, or excerpt text, in addition to the product image and title text. In addition, I needed to remove the default ‘clickable image’ behavior. Both of these were easy to accomplish through some WooCommerce filters.
Getting Started With Modifications to Your Divi Theme
To accomplish our desired outcome, we will need to modify some Divi PHP code. This tutorial does not require you to have any previous PHP coding knowledge or experience, but you will need to know how to FTP into your WordPress website, how to download and upload a file, and how to use a basic text editor.
The first step is to create a child theme so that your Divi theme remains intact and can be updated without overwriting your custom PHP code.
Creating a Divi child theme is as simple as this: (if you’d like more details, please read this excellent guide by Elegant Themes)
Step 1
In your wp-content/themes directory, create a new folder and name it Divi-Child.
Step 2
In your new Divi-Child directory, create a new file named style.css. In that file, copy and paste the following code, then hit save.
/*
 Theme Name: 	Divi Child
 Theme URI:  	https://www.elegantthemes.com/gallery/divi/
 Description:	Divi Child Theme
 Author:     	Elegant Themes
 Author URI: 	https://www.elegantthemes.com
 Template:   	Divi
 Version:    	1.0.0
*/
Step 3
In the new Divi-Child directory, create a new file named functions.php. In that file, copy and paste the following code, then hit save.
<?php
function my_theme_enqueue_styles() {
    wp_enqueue_style( 'parent-style', get_template_directory_uri() . '/style.css' );
}
add_action( 'wp_enqueue_scripts', 'my_theme_enqueue_styles' );
Step 4
In your WordPress admin panel, go to appearance -> themes and activate your new theme. At this point, no new functionality has been added yet, but you should check your website to ensure that it works as expected.
Adding an Excerpt to the WooCommerce Product List
Now that we’re ready to actually start modifying our Divi Shop Module, let’s get started.
In this scenario, we will add the product’s short description, or excerpt text, to the product list output.
Default View
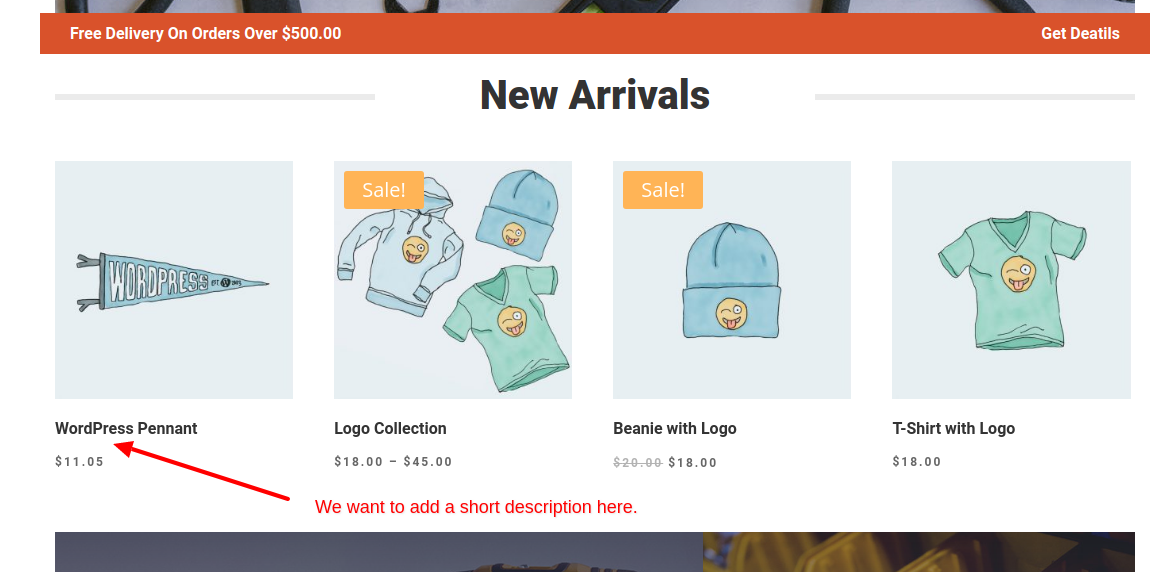
So let’s take a quick look at what the product listing looks like by default, without making any changes.
One thing to note, is that this may look different for you, depending on the custom layouts that you are using. For this example, I am using Divi’s ‘hardware store shop’ page layout. Here is how the section in question looks:
Modification
So the problem that we have is that there is no setting in the module to display the products’ excerpt text.
Fortunately, the solution is very easy. With our child Divi theme set up and ready to go, we will simply override the function responsible for processing this WooCommerce element so that our short description is added.
Here we go.
Step 1
Open the Divi child theme’s functions.php file, copy and paste the following code, then hit save.
if ( ! function_exists( 'woocommerce_template_loop_product_title' ) ) {

	/**
	 * Override the product lists on category pages to include the product excerpt.
	 */
	function woocommerce_template_loop_product_title() {

		// Display the title.
		// If you would like to modify the title markup or content, you can do so here.
		echo '<h2 class="' . esc_attr( apply_filters( 'woocommerce_product_loop_title_classes', 'woocommerce-loop-product__title' ) ) . '">' . get_the_title() . ' </h2>';

		// Add our product short description.
		echo '<p>' . get_the_excerpt() . '</p>';
	}
}
And thats’ it!
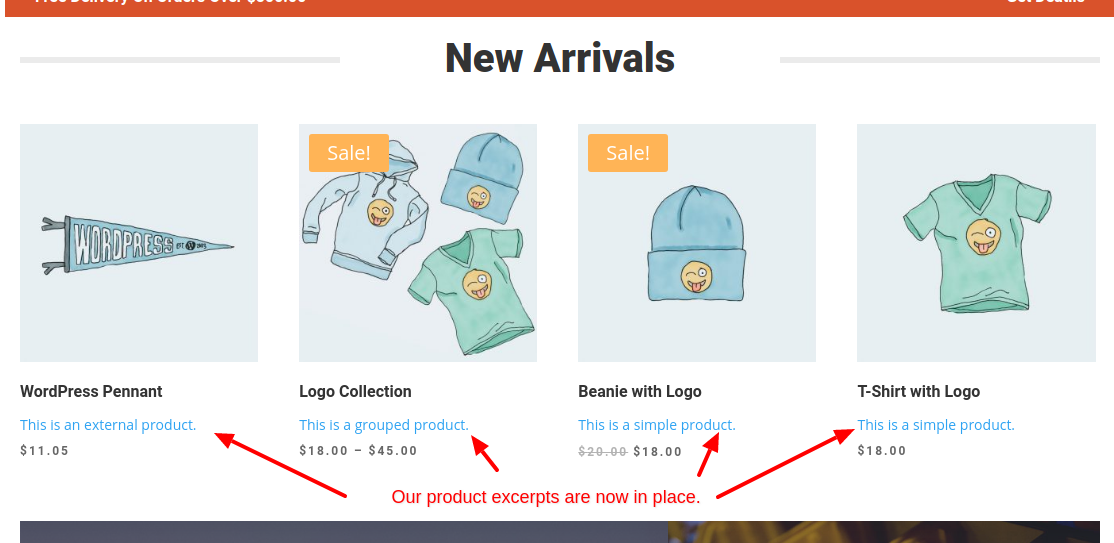
Modified View
So now let’s take a look at our modified product listing:
Changing the Product Link Markup
Now that we have each product’s short description displayed as part of the listing, we will modify it so that that:
- The entry is NOT clickable.
- Instead of the clickable product listing, we will add a button which will take the user to the specific product page.
- In addition to the ‘view product’ button, we will add an ‘add to cart’ button as well.
Default View
So here is the view that we currently have (including out changes from the `Adding an Excerpt to the WooCommerce Product List` section:
Modification
Since we don’t have module setting to modify this display behavior, we will do it with a few lines of code without making any changes to the core code, i.e, no hacks.
To accomplish this, do the following:
Step 1
Open the Divi child theme’s functions.php file, copy and paste the following code, then hit save. This code will change the image and title so that neither are clickable.
if ( ! function_exists( 'woocommerce_template_loop_product_link_open' ) ) {
	/**
	 * Insert the opening anchor tag for products in the loop.
	 */
	function woocommerce_template_loop_product_link_open() {

		echo '<div>';
	}
}

if ( ! function_exists( 'woocommerce_template_loop_product_link_close' ) ) {
	/**
	 * Insert the opening anchor tag for products in the loop.
	 */
	function woocommerce_template_loop_product_link_close() {

		echo '</div>';
	}
}

if ( ! function_exists( 'woocommerce_template_loop_product_thumbnail' ) ):
function woocommerce_template_loop_product_thumbnail() {
	echo woocommerce_get_product_thumbnail();
}
Endif;
Step 2
Now let’s add our add to cart button. In the functions.php file, add the following code to our previously inserted woocommerce_template_loop_product_link_close function. If you did not implement the previous functions and ONLY want to add the add to cart button, simply remove the “echo ‘</div>’;” line. So here is what your funciton should look like after inserting the code:
if ( ! function_exists( 'woocommerce_template_loop_product_link_close' ) ) {
	/**
	 * Insert the opening anchor tag for products in the loop.
	 */
	function woocommerce_template_loop_product_link_close() {

		echo '</div>';

		// This code will add the ‘add to cart’ button
		echo do_shortcode('[add_to_cart show_price="false" class="my-custom-woo-button" id="'.get_the_id().'"]');
	}
}
And that’s it! But one thing to note, is that you may need to style the button, so it’s a good idea to add your own, custom class for easy css targeting. In this case, we added the my-custom-woo-button class to the button.
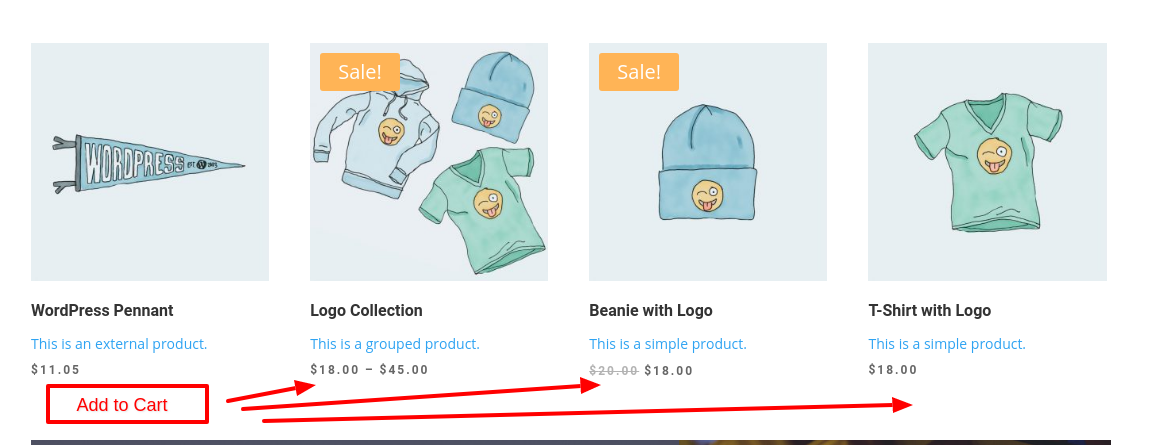
Modified View
Ok, so let’s take a look at the finished product. Please not that the buttons were styled using our custom class.

Full Code
Here is the full code to be added to your functions.php file:
if ( ! function_exists( 'woocommerce_template_loop_product_title' ) ) {

	/**
	 * Override the product lists on category pages to include the product excerpt.
	 */
	function woocommerce_template_loop_product_title() {
		echo '<h5 class="' . esc_attr( apply_filters( 'woocommerce_product_loop_title_classes', 'woocommerce-loop-product__title' ) ) . '">' . get_the_title() . ' </h5>';
		echo '<p>' . get_the_excerpt() . '</p>';
	}
}

if ( ! function_exists( 'woocommerce_template_loop_product_link_open' ) ) {
	/**
	 * Insert the opening anchor tag for products in the loop.
	 */
	function woocommerce_template_loop_product_link_open() {

		echo '<div>';
	}
}

if ( ! function_exists( 'woocommerce_template_loop_product_link_close' ) ) {
	/**
	 * Insert the opening anchor tag for products in the loop.
	 */
	function woocommerce_template_loop_product_link_close() {

		echo '</div>';
		echo do_shortcode('[add_to_cart show_price="false" class="my-custom-woo-button" id="'.get_the_id().'"]');
	}
}

if ( ! function_exists( 'woocommerce_template_loop_product_thumbnail' ) ):
function woocommerce_template_loop_product_thumbnail() {
	echo woocommerce_get_product_thumbnail();
}
endif;
Conclusion
In this post, we learned how to do a quick edit to Divi’s shop module, which is used to display a list of WooCommerce products. Although Divi provides a plethora of controls for the module, they can’t cover all use cases. Fortunately, between WordPress, WooCommerce, and Divi, the code is equipped with hooks and overrides to easily accomplish almost any special requirement that you may have.
If you need help with your Divi website, please take a look at our website design services page or contact us online.
Happy coding!